

Grove Beginners kit: Arduino Lesson 2 Press Button
ardgrove arduino grove
This extends the previous lesson by adding a button to control the LED’s state.
| The Grove Beginner Kit For Arduino includes an Arduino Uno board with preconnected devices. The Grove lessons supporting this present coding using the Arduino IDE. These pages present the same lessons using the Codecraft IDE that uses the Block style of coding with specific Grove Arduino blocks. |
About
A button as a digital input can be used to control a digital output to an LED.
the input of the button is a digital signal, and so there are only two states, 0 or 1, OFF OR ON. So it can control the output to the LED by setting it to the same state as input.
Grove Beginners Kit
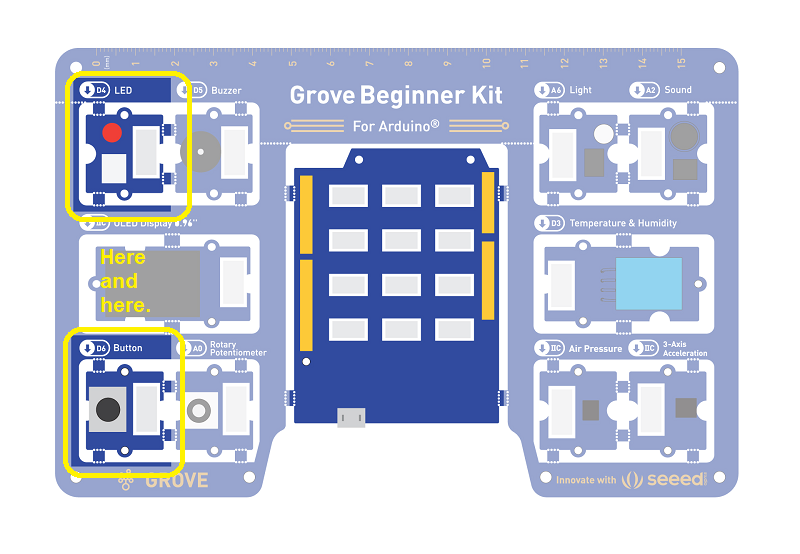
Components this lesson
- Grove LED
- Grove Button
| Component | Interface | Type | Pins or Address |
|---|---|---|---|
| LED | Digital | output | D4 |
| Buzzer | Digital | output | D5 |
| OLEDDisplay0.96" | I2C | display | I2C 0x78(default) |
| Button | Digital | input | D6 |
| RotaryPotentiometer | Analog | input | A0 |
| Light | Analog | sensor | A6 |
| Sound | Analog | sensor | A2 |
| Temperature&HumiditySensor DHT22 | Digital | sensor | D3 |
| AirPressureSensor BMP280 | I2C | sensor | I2C 0x77(default)/0x76(optional) |
| 3-AxisAccelerometer | I2C | sensor | I2C 0x19(default) |
Hardware connection
For these lessons, the Components are already connected through the board. That is, for this lesson, LED module is already connected to D4 on the microprocessor.
The lesson code block.
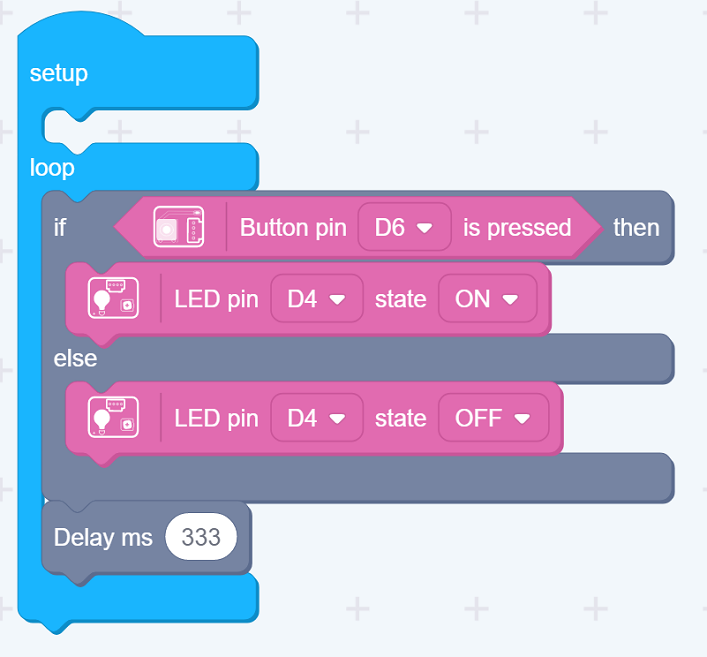
Code Analysis
Setup
The input D6 and output D4 are automatically set to input and output. No coding needed.
Loop
IF D6 is Hi (Button is pressed)
- THEN Set D4 to Hi and so turn the LED on
- ELSE Clear D4 and so turn LED off
Loop means that this part gets continuously repeated.
How to create this ...
Watch the video on Youtube:
For this lesson: Press the button and the LED should light; and go off when released.
A short delay is added to each loop so that the microprocessor isn’t always busy doing nothing.
| Topic | Subtopic | |
| Next: > | Jekyll | Layouts as a Template |
| This Category Links | ||
| Category: | Arduino Beginners Index: | Arduino Beginners |
| < Prev: | Grove Beginners kit | Arduino Lesson 1b Download program to board |


